
This fly is over a hundred years old. That means you won’t see it in many fly shops and it rarely appears on Top Ten lists. But if you take the time to ask around, you’ll find this fly in some very selective fly boxes. There was a time when this fly was a “must have” for anyone traveling to Maine in the late 1800’s. In fact, no less authority than Mary Orvis Marbury included this fly in her book Favorite Flies and Their Histories. (If you’d like to read this book and others like it you can download it from Google Books free of charge). Queen of the Waters can be a deadly fly and the palmered hen hackle is a great technique to know about.
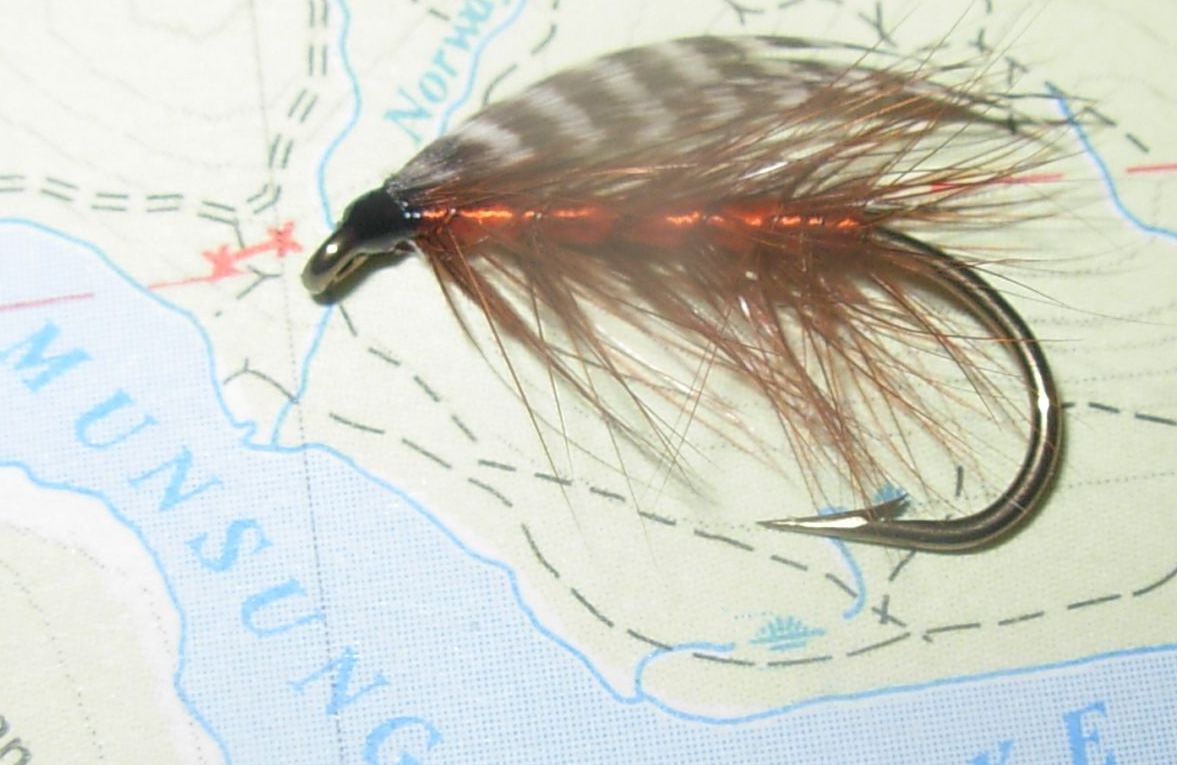
Recipe for the Queen of the Waters
Thread – Black
Hook – Standard wet, size 6-12
Body – Orange floss
Rib –Brown hen hackle, palmered
Wing – Teal
While you can use other hooks for this fly, I used a Mustad 3906, size 6. This is a heavy hook that will sink quicker than a dry fly hook and has a more traditional look to it. The floss body is burnt orange. There are several shades of orange floss available; burnt orange is a classic color that you see a lot. Personally, I think this fly should be tied in a half dozen colors. Yellow, bright orange, olive, red and brown all come to mind.
The palmered hackle rib is created with hen hackle. I used a Whiting brown hen neck, but any soft hackle feather will do. Rooster hackle will be too stiff for this fly; you want the fibers to sweep back toward the bend of the hook. Start by tying in the floss for the body. The next step is important, tie in the hackle feather by the tip, not the butt. In this way the hackle fibers get progressively longer as you wind it to the front of the body. Wrap the floss body first. The traditional method is to start the rear of the body directly above the midpoint of the hook point and the end of the barb. I don’t think the trout measure this but I thought I’d mention it. Some tiers feel that one layer of floss, when wet, will show the dark thread windings underneath. That may be good, who knows. If you are concerned about that, you can use white thread for the beginning of this fly, or you can wind several layers of floss for the body. Tie off the floss behind the eye and wind the hackle feather forward. Tie it off behind the eye. Use your fingers to roll back the hackle fibers so they are swept back and not sticking out from the body perpendicularly. I feel this fly works well when it is not too bushy, in other words, spread out your hackle windings a bit. Five or six wraps should be plenty.
The wing is either teal or mallard breast. I use teal a lot because I like the darker barred markings but mallard works well and may be easier for a duck hunter to come by. Both feathers are inexpensive and available in fly shops. There are a number of ways to set the wings on this fly and wet flies in general. The traditional method of carefully arched, swept wings looks good, especially in books and in display cases. I have nothing against taking the time to make a beautiful set of wings but I learned pretty quickly that brook trout have teeth and they use them. One fish can tear those wings up and leave you with a fly that has a barred wing, but not as neat as when it when it the box. I also learned pretty quickly that the more torn up a fly was, the better it fished. There are probably a couple of reasons for that but my point here is that you don’t have to struggle for a perfect wing on this fly. The easiest wing to make is called a rolled wing. Strip off some feather fibers from a teal or mallard breast feather and use your thumb and fore finger to roll the fibers into a wing of the thickness you want. Tie in the wing to be a little longer than the body, snip off the excess butt ends and form a head.

I haven’t seen this fly since I tied up a bunch a few years ago. Thanks for sharing it.
Thanks for this excellent post! I’m about to go find the Favourite Flies and Their Histories book on google books. Much appreciated – metiefly
You’re both welcome, I love wet flies and this is a great one! Hugh