The Grizzly King

kelly_may_2008

This fly is an old favorite that seems to surface every few years and then disappear for awhile. Part of the reason is that wet flies have fallen out of fashion and the Grizzly King is an old wet fly. I remember this seeing this fly in my father’s pattern book 40 years ago and it was considered old, then. The original dressing is attributed to a Professor John Wilson of Edinburgh University, Scotland. Colonel Bates credits the streamer version of this fly to Gardner Percy of Portland, Maine. The fly is supposed to represent a form of caddis fly and that explains why it works so well here.

I use this fly in both wet and streamer versions and I pretty much tie it in size 12. Ray Bergman’s classic Trout goes into great detail about different sizes depending on which species of trout you’re fishing over. Size 12 works best for me, although I think this fly in smaller sizes would fish well. If you’ve got the eyes for it, downsize to a 14 or 16 and let me know how it works for you.

Recipe for the Grizzly King

Thread – Black
Hook –8-12 wet (4x hook for streamer)
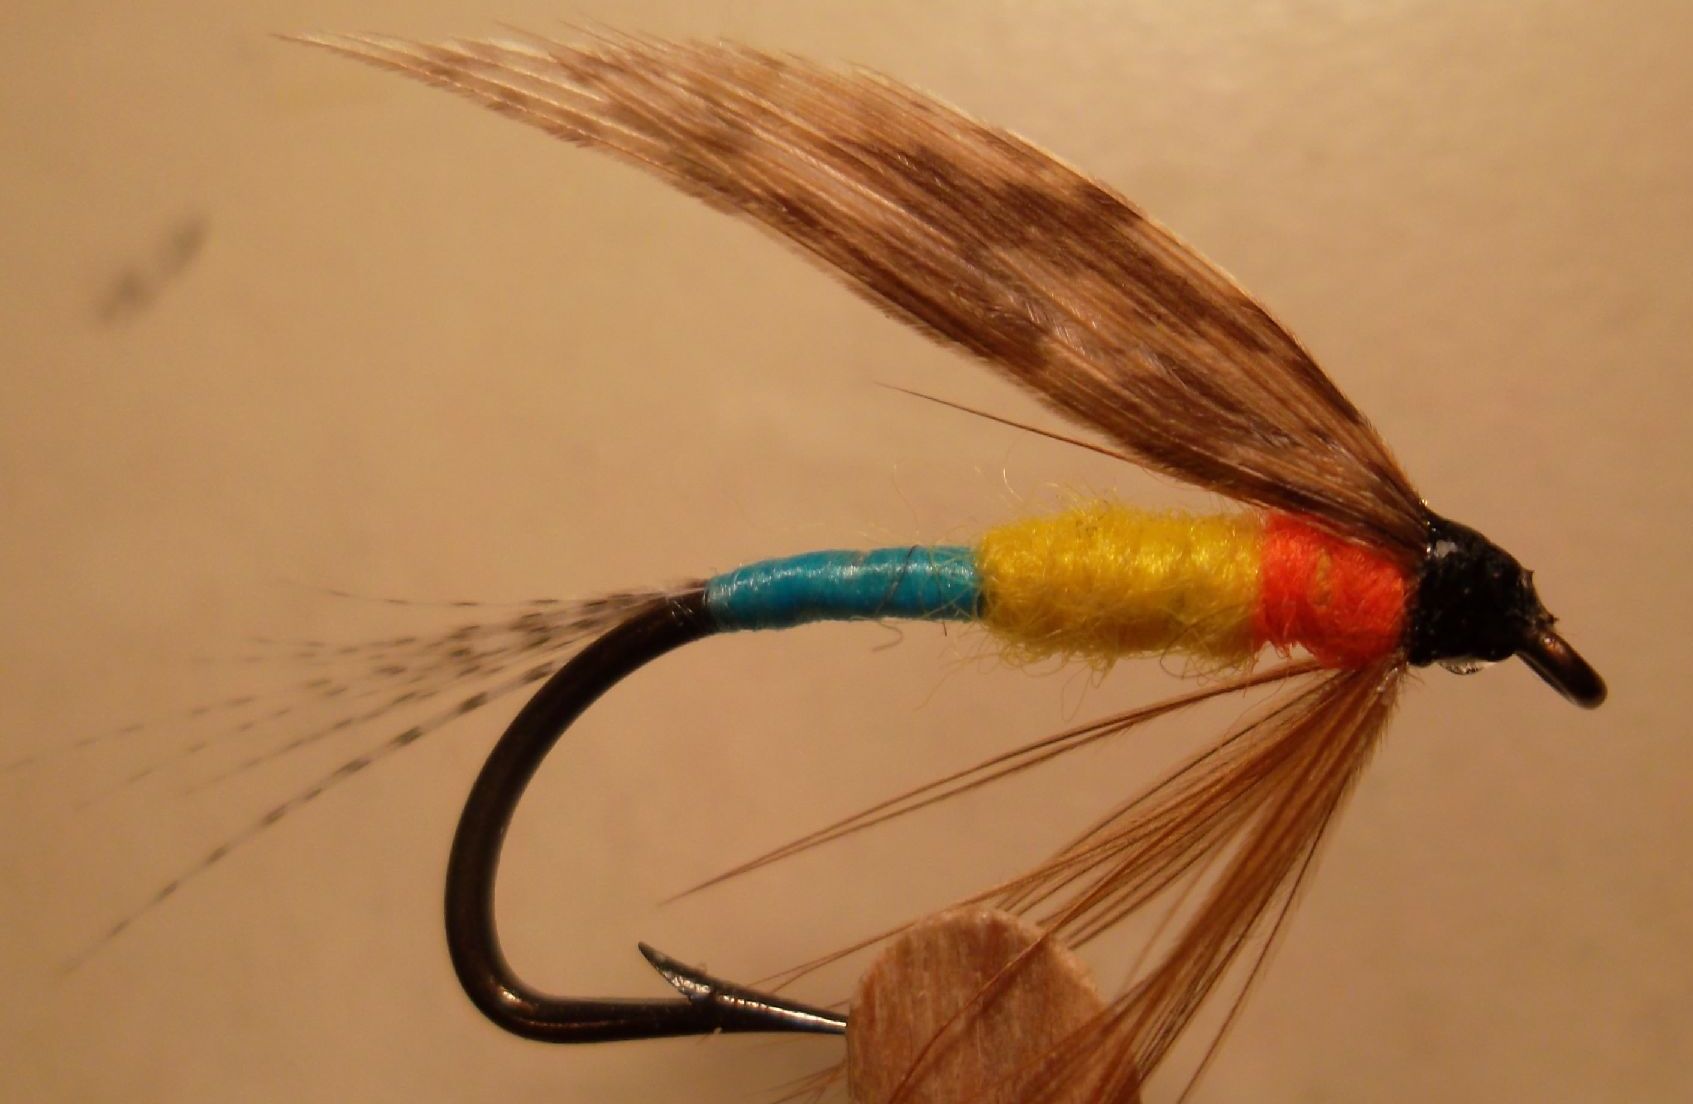
Tail –Red duck quill or hackle fibers
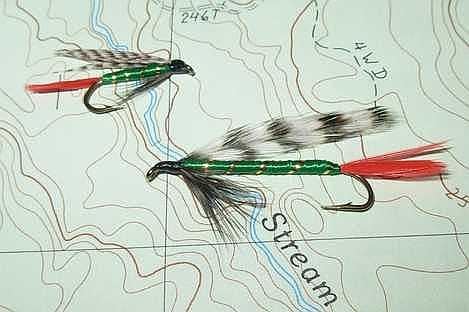
Body – Green floss
Rib – Thin gold Mylar
Throat – Grizzly hackle fibers (hen if possible)
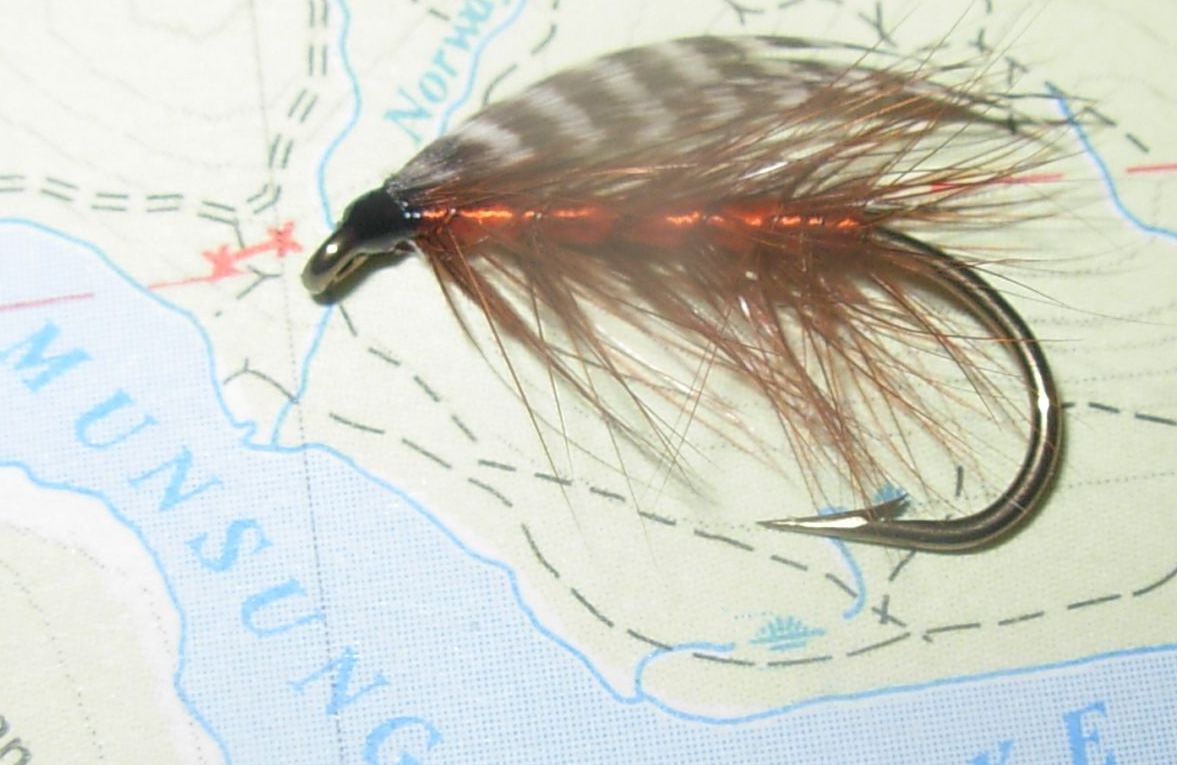
Wing – Rolled mallard flank, for streamer use grizzly

While the old version called for red duck quill angled upward for a tail, I think red hackle fibers work fine. The Mylar should be very fine; I use size 16/18. The throat hackle is tied in beard style and will have better movement if you use soft hen grizzly hackle. It is a good technique to use white thread on the hook shank under the floss. Wet floss over dark thread can become too dark. That is especially true of yellow or gold floss but the green floss seems to do fine with dark thread under it. If you are inclined, using white thread for the first part of this fly is a good habit. The old recipes speak of “rolled” mallard flank as opposed to the highly stylistic swept and pointed wings you see on other wet flies in old color plates. I think that is a concession to the fact that after several fish chewing on those wings, they become shredded anyway so why not roll them to begin with. You have to admit, when the old writers recommend fish proofing the wings, that’s a sign of a good fly. Just cut a small bunch of mallard flank fibers, roll them between your thumb and forefinger, and then tie them in. A rolled wing can make for a lot of bulk and a huge head. Use as fine a thread as you can to avoid that. As for the streamer, keep the hook as small as you can and use grizzly hackles for your wing. Percy’s recipe calls for four hackles, two on each side. I use two hackles and I let the wings angle up a bit. I think it has better action tied that way. I’m sure it all depends on how you fish the fly, so keep in mind that you may want to stick with the tried and true recipe.

This is a venerable old pattern that deserves more use than it gets. Ask the oldest, best, fly fisherman you know about the Grizzly King. Watch his eyes when you ask. If they look away quickly and he tells you he doesn’t think much of it, check the side pocket of his fly wallet. I bet he has a few.

Posted in Fly patterns | Tagged , , | 1 Comment

The Stayner Ducktail

stayner
I first saw the Stayner Ducktail when I was stationed in Montana more than 30 years ago. It was featured in a book by Marv Taylor and suggested for pond “dredging”. Dredging is when you cast out a fly, let it sink and slowly twitch it back; if you’re not trying this technique, you’re missing out. The fly design is over 80 years old and it works very well here in Maine. You should keep a few of this easy to tie killers in your box; this pattern is not widely seen here in Maine and it takes good sized trout.

Recipe for the Stayner Ducktail

Thread – Black
Hook – Streamer hook, 4x long. Size 4-10
Tail – Red hackle fibers
Body – Olive chenille
Hackle- Red hackle fibers, beard style
Rib- Gold Mylar
Wing – Mallard flank feather, flat-wing style

Start with a 4x long streamer hook. This is shorter than the 8x long streamer hooks we traditionally use for streamers up here. Tie in the red tail, rather long. Tie in some gold Mylar for a rib, to be wrapped later. The body is olive chenille, you should also try olive variegated chenille. Use your thumbnail to strip off a quarter inch or so of the chenille fibers. You’ll see that the core of the chenille is a couple of strands of cotton thread. If you tie in your chenille by these strands of thread, you won’t have a “bump” at the rear of your fly. Wrap the chenille forward to just behind the eye and tie off; trim the excess. Now wrap the Mylar rib forward. Try wrapping it in the opposite direction that you wrapped the chenille body. This will keep it from sinking into the chenille too far and being out of sight. It’s important to remember to wrap the Mylar tight, a trout’s teeth can catch on it and cut it or pull it loose.

Tie in a red hackle fiber beard and select a mallard flank feather for a wing. Take a minute to notice that mallard flank feathers come in two shapes: long and thin or short and wide. You want the long and thin ones for this wing. The wing should lay flat on the body and extend to just past the end of the tail. Strip off the excess fibers at the base of the mallard flank until what you have left is a feather the right length and then tie it on top. Trim off the excess stem. I also get good results with dyed olive mallard flank.

I don’t know whether this fly is mistaken for a dragonfly nymph or for a small baitfish, but it is effective. Easy to find materials, easy to tie, easy on the wallet, and attractive to trout. You should tie some of these.

Posted in Fly patterns | Tagged , , , , | 4 Comments

The Picket Pin

kelly_sept_2008c

This fly is another old one that you don’t see much anymore, although it is fished around the world in various versions. Originating in the western U.S., this pattern is named for the ground squirrels that stand by their burrows like “picket pins”. Typically, as a pattern migrates to another part of the country, there are always a few changes to accommodate local tastes. This fly’s original recipe called for gold wire ribbing; that became brown hackle tied palmer style when the fly arrived on the East coast. Palmer style hackle is simply a hackle that is wound up the body as a rib instead of being wound at the head as a collar. Although the original wing material probably came from the ground squirrel it is named for, here we use gray squirrel. I think a red tail brings a lot more strikes, and I’ve been known to use dyed squirrel tail for the wing as well as the original gray. Notice that there is a peacock herl head tied in front of the wing. Don’t leave that off; I think it is an important feature and makes it a useful imitator for stoneflies, dragonfly nymphs etc.

Recipe for the Picket Pin

Thread – Black
Hook –4X long, size 8-14
Tail –Brown or red hackle fibers
Body – Peacock herl
Rib –Brown hackle palmered
Wing – Gray squirrel
Head – Peacock herl

Tie in the tail and then tie in a brown hackle feather by the tip. I’ve seen a recipe that called for the tail to be the tip of the hackle feather, not a bad method. Then tie in perhaps three or four peacock herls for the body. Peacock herl has been a fish getter for centuries so buy good herl and use it. After you’ve tied in the herls but before you wind your thread forward, consider twisting the herls and the thread together to make a peacock herl “rope”. Without a wire rib this technique will hold the herl together and make the fly stronger. Wind the herl rope forward but stop well short of the eye so you can leave room for the rather large head. After you tie off the herl, wind the hackle feather forward to the tie off point and trim the excess materials. Tie in a squirrel tail wing and finish the fly by tying in more herl for a large head. Be sure to make the head full and wind it back to cover the thread wraps used to secure the wing. Placing a drop of cement on the thread wraps before you wind over them will help hold the wing on when a fish takes it; gray squirrel is a slippery hair and easy to pull out. I use cement that is diluted 50% with thinner for those jobs when I want the cement to penetrate thread wraps and glue the material under the wraps.

I’ve substituted black hackle and clipped off the top when I hoped the fly would be taken for a stonefly. You can imitate both caddis and mayfly fly emergers with it. Fished dry, it could be taken for a Dobson fly or a hopper. Like all good flies, the Picket Pin can imitate several food sources and with substitutions you can soon have your own “secret fly”. If you want a head start on that, try a size 14 with woodchuck for the wing and grizzly for the hackle.

Start with the recipe I’ve shown you; it doesn’t use expensive materials, it’s easy to learn and you’ll catch fish with it. A youngster will catch fish with it too if you’ll take the time to show them.

Posted in Fly patterns | Tagged , , | Leave a comment

The Edson Tigers

kelly_Dec_2008
This set of streamers is a companion set created in 1929, coincidently the year of another stock market crash. The light and dark versions of these old bucktail streamers are found in most recipe books, better stocked fly shops and your grandfather’s fly wallet. Bill Edson originally tied these with gold metal cheeks instead of Jungle Cock eyes. His mail order catalog developed quite a following and the once optional gold cheeks were so much in demand that they became his standard. When you can find these streamers today, they are tied with a Jungle Cock cheek tied short, or with no cheek at all to save cost. If you want to try these streamers with the metal cheeks, you can get them from theriaultflies.com.

The Dark Tiger has a dark wing and a light body while the Light Tiger has a dark body and a light wing. There are old theories that you should select your fly color in accordance with the sunshine. Dark streamers for dark days-light streamers for light days. I’ve used that method and it works but to be honest, I’ve switched colors and had good results too. Bill used yellow chenille for the Dark Tiger and peacock herl for the Light Tiger. The length of the yellow chenille body is a good approximation of a mayfly nymph and I’ve lost track of the number of fish I catch on flies tied with peacock herl. This tells me that these streamers imitate multiple food sources and will fish well under varying conditions.

The Edson Dark Tiger wing is made with the brown hair off a buck tail dyed yellow. If you select the hair from the base of the tail, the wing will flare and you’ll quit in disgust. Try the yellow tinged brown hair near the tip of the tail. It isn’t as hollow and the hair around the base and lays down a great wing.

Recipe for the Edson Dark Tiger
Thread – Yellow (or yellow lacquer over black)
Tag- Several turns of gold tinsel
Hook – 4x shank
Tail –Two yellow hackle feather tips, small, tied back to back
Body – Fine yellow chenille
Throat – Two small red hackle tips (or hackle fibers)
Wing – Brown hair from yellow dyed bucktail, as long as the tail
Cheeks- Jungle Cock tied short

Recipe for the Edson Light Tiger
Thread – Black
Tag- Several turns of gold tinsel
Hook – 4x shank
Tail –Barred wood duck, showing two black bars
Body – Peacock herl, tied full
Wing – Yellow buck tail, as long as the tail
Topping- Short red neck hackles, 1/3 length of wing
Cheeks- Jungle Cock tied short

The tails on both streamers are distinctive and I recommend you tie them as the recipe describes, I think they’re important. The red feathers are something I feel free substituting fibers for hackle tips because they are small and seem to be there for color rather than movement. I use Jungle Cock for the cheeks because when my streamers have eyes or cheeks they catch more fish. Jungle Cock is getting cheaper in small bunches if you shop around.

There are a lot of flies to tie and to fish with, and almost all of them catch fish one day or another. As more and more new patterns appear on the scene, we forget the old standbys. Then, if you’re lucky, you stumble onto a recipe of an almost forgotten fly that had its hey day long ago. You tie it, cast it, and then you’re mesmerized by the intensity of the strike. It turns out that the fish never forgot the fly, we did.

Don’t forget these old flies; some of them were bringing big fish to old nets long before you and I were born.

Posted in Fly patterns | Tagged , , | Leave a comment

Queen of the Waters

Queen of Waters

This fly is over a hundred years old. That means you won’t see it in many fly shops and it rarely appears on Top Ten lists. But if you take the time to ask around, you’ll find this fly in some very selective fly boxes. There was a time when this fly was a “must have” for anyone traveling to Maine in the late 1800’s. In fact, no less authority than Mary Orvis Marbury included this fly in her book Favorite Flies and Their Histories. (If you’d like to read this book and others like it you can download it from Google Books free of charge). Queen of the Waters can be a deadly fly and the palmered hen hackle is a great technique to know about.

Recipe for the Queen of the Waters

Thread – Black
Hook – Standard wet, size 6-12
Body – Orange floss
Rib –Brown hen hackle, palmered
Wing – Teal

While you can use other hooks for this fly, I used a Mustad 3906, size 6. This is a heavy hook that will sink quicker than a dry fly hook and has a more traditional look to it. The floss body is burnt orange. There are several shades of orange floss available; burnt orange is a classic color that you see a lot. Personally, I think this fly should be tied in a half dozen colors. Yellow, bright orange, olive, red and brown all come to mind.

The palmered hackle rib is created with hen hackle. I used a Whiting brown hen neck, but any soft hackle feather will do. Rooster hackle will be too stiff for this fly; you want the fibers to sweep back toward the bend of the hook. Start by tying in the floss for the body. The next step is important, tie in the hackle feather by the tip, not the butt. In this way the hackle fibers get progressively longer as you wind it to the front of the body. Wrap the floss body first. The traditional method is to start the rear of the body directly above the midpoint of the hook point and the end of the barb. I don’t think the trout measure this but I thought I’d mention it. Some tiers feel that one layer of floss, when wet, will show the dark thread windings underneath. That may be good, who knows. If you are concerned about that, you can use white thread for the beginning of this fly, or you can wind several layers of floss for the body. Tie off the floss behind the eye and wind the hackle feather forward. Tie it off behind the eye. Use your fingers to roll back the hackle fibers so they are swept back and not sticking out from the body perpendicularly. I feel this fly works well when it is not too bushy, in other words, spread out your hackle windings a bit. Five or six wraps should be plenty.

The wing is either teal or mallard breast. I use teal a lot because I like the darker barred markings but mallard works well and may be easier for a duck hunter to come by. Both feathers are inexpensive and available in fly shops. There are a number of ways to set the wings on this fly and wet flies in general. The traditional method of carefully arched, swept wings looks good, especially in books and in display cases. I have nothing against taking the time to make a beautiful set of wings but I learned pretty quickly that brook trout have teeth and they use them. One fish can tear those wings up and leave you with a fly that has a barred wing, but not as neat as when it when it the box. I also learned pretty quickly that the more torn up a fly was, the better it fished. There are probably a couple of reasons for that but my point here is that you don’t have to struggle for a perfect wing on this fly. The easiest wing to make is called a rolled wing. Strip off some feather fibers from a teal or mallard breast feather and use your thumb and fore finger to roll the fibers into a wing of the thickness you want. Tie in the wing to be a little longer than the body, snip off the excess butt ends and form a head.

Posted in Fly patterns | Tagged , , | 3 Comments

Big Trout Only and Maple Syrup

This pair of flies is from Alvin Theriault (www.theriaultflies.com) of Staceyville, ME. Most fly fishers have heard of the Maple Syrup, it’s an elegantly simple imitation of a Hexagenia Limbata mayfly nymph and has a well deserved reputation. If you find yourself on a pond with a silt or muddy bottom then this should be the first fly on your rod.

The second fly is a real sleeper. Literally. This was a secret fly in the Millinocket area in the 1960’s. Apparently some cagey but successful fly fishermen used this fly in the fall to pull very large trout out of the spring holes, especially in the Katahdin area. Alvin doesn’t know the originator’s name but as the story goes, whoever it was stopped tying them and the fly gradually disappeared from use. In 2000, someone found a half dozen that had been misplaced and brought them to Alvin to duplicate. Alvin had to arrange with Danville for the peacock color chenille in the right size to be produced again. The fly is successful all season he gets a lot of orders for it. Alvin feels it represents a dragonfly or a crayfish. Since the fly was not named, Alvin calls it the Big Trout Only.

Recipe for the Maple Syrup
Thread – Black
Hook –Size 10, 6x long
Tail – Yellow calf tail, sparse
Body – Size 2 (medium) beige Danville Rayon chenille, two wraps

Recipe for the Big Trout OnlyThread – Black
Hook – Size 6, 6x long
Body – Size 3 (large) Peacock Danville Rayon chenille, two wraps

Tying these flies is simple, but there are some rules. First, you can change the suggested sizes and colors if you want, but the recipes above seem to be the best producers. Second, you may be tempted to use only one wrap of chenille. Resist that temptation – both flies call for two wraps of chenille. Tie in at the eye, wind back and then wind forward over your first wrap. That’s two layers and anything less just doesn’t work as well. Third, the tail on the Maple Syrup should be sparse. Using too much material is the most common mistake fly tiers make. And lastly, the chenille on the Big Trout Only is wrapped back into the bend of the hook and then wrapped forward to the eye. If you only wrap it back to the point of the hook shank where the bend starts, some trout will spit it out. If you wrap the body a bit down into the bend of the hook, you’ll get better hookups.

Both flies should be fished slow and deep. You can tie a weighted version by wrapping heavy wire on the hook shank if you like. There is also a bead head version of the Maple Syrup that works well. If you decide to try this you should note that the bead will only fit on TMC 300 or Mustad Lightning Strike hooks. While I’ve never tried it, there are reports that the Maple Syrup will fish well as an ice fishing jig. And Alvin says that the Big Trout Only is being trolled in Aroostook County by people who keep ordering more flies.
Don’t let the simplicity of these two flies fool you. They catch fish.

Posted in Fly patterns | Tagged , , | 3 Comments

Katoodle Bug

katoodlebug
The Katoodle Bug or Toodle bug, the primary go-to fly in the late 1800’s. I was reading a copy of Favorite Flies and Their Histories by Mary Orvis Marbury and noticed that this fly is mentioned quite often. You can buy a new printing of this book for a few dollars and you should check it out. The author is the daughter of the famous Charles Orvis. Mr. Orvis sent letters to fishermen asking about their favorite flies and he took three years to collect the replies. His daughter compiled the data and published her encyclical book in 1892. There aren’t any fly tying recipes but I love to read about what worked on trout during those years.

I started to notice the name Katoodle Bug showing up frequently in the Orvis book as a favorite fly; it seemed that everyone loved it. I had never heard of it. So I looked in a couple of other old books: Du Bois in 1960 and J. Edson Leonard in 1950 each list the fly and a recipe. Du Bois lists 12 versions.

I thought for a moment to make sure I understood the situation. Here is a deadly fly that no one wants to be without in 1800’s Maine. It is in demand enough to be documented by several well-respected texts in the mid 1900’s. It’s apparently fallen off the radar because I’ve never seen it in a fly shop or in a modern fly tying manual. That means very few fly fishers are using this very good fly. Perfect.

Recipe for the Katoodle Bug

Thread – White and black
Hook – Standard wet fly, size 6-10
Tail – Grey mallard flank
Body – Blue floss or Uni-Stretch rear half, yellow wool front half, small band of orange
Hackle – Brown hackle- beard style
Wing – Mottled turkey

The tail is a bit long and the recipe calls for gray mallard. If you use blue or yellow floss, you should use white thread; black thread will show through wet floss. I used blue Uni-Stretch because I find it easier to work with. As I said before, there are over a dozen recipes for this fly, I chose one I liked, but they were all very similar. This version has yellow wool for the front half of the body, you can use floss if you prefer. If you use wool, use a very fine yarn. You may have to unbraid your yarn to get a fine enough piece. Most recipes call for a small band of orange just ahead of the yellow and just behind the beard hackle. The hackle is tied beard style, just a small bunch of soft brown hackle fibers tied in behind the eye; they should reach the hook point. Most of the recipes called for mottled turkey quill for a wing, you can use any brown mottled feather you like, even partridge tail. After a trout or two the wings will look pretty ragged. I used turkey here to demonstrate the wing described in the original recipe, but the flies in my box tend to favor rolled partridge tail fibers for wings. They’re cheaper and easier, the trout don’t seem to mind.
This is another of those old flies that inhabit Maine legends. This particular fly was the “must have” fly before Teddy Roosevelt learned to speak Spanish and I seriously doubt that you’ll find it in many fly boxes these days. Now that you know how to tie one; go show a youngster.

Posted in Fly patterns | Tagged , , , , | 2 Comments

Black Ghost Marabou Streamer

Kelly_Dec_2006
The Black Ghost Marabou streamer, great fly! Herb Welch created the original Black Ghost in the 1920’s. Herb is considered to be the inventor of the streamer fly by some people and while his designs may have originated in the Rangeley region, they became famous all over the world. The streamer that Herb developed was tied had a white saddle hackle wing. The marabou version is a favorite in Maine for some very good reasons. They are easier to tie once you learn how and the marabou catches fish so well it should be outlawed. This is a great streamer to cast after ice out and it continues to produce as a trolled smelt imitation all through the summer.

Recipe for the Black Ghost Marabou Streamer

Thread – black

Hook – Size 4 streamer, 6X or 8X long

Tail – Yellow hackle barbules

Body – Black Uni-Stretch or black floss

Rib – Silver Mylar

Throat – Yellow hackle barbules

Wing – White marabou

Eyes – optional
Start with a streamer hook. I prefer 8x but you can use a 6x if you like. Tie on a small clump of yellow hackle barbules. Out west the fly is tied with a huge bunch of hackle for the tail and a big black chenille body. That won’t work here so if you see a pattern like that on the Internet you should know that you are looking at a fly intended for west coast fish. In Maine, this fly should have a somewhat sparse tail. The tail should be as long as the hook gap. Tie on some silver Mylar. At this point you should tie in your body material. I love a product called Uni-Stretch. I think is ties better than floss for some flies but you can use floss if you prefer it-the original was tied with black floss. Choose your weapon, floss or Uni-Stretch and tie it in. Now form a black body up to a point just before the hook eye. If you tie too close to the hook eye, you will have no room for a properly sized head. The correct distance to stop short of the eye is the width of the eye itself, not quite an eighth of an inch. Clip off the excess floss and wrap the silver Mylar rib up to the eye and trim off. Now tie in a yellow throat, beard style. Again, don’t go bushy here. The length of the throat should be about same length as the tail hackle fibers.

Now it is time to tie on a white marabou wing. Anyone looking into my streamer box will notice that I have a lot of soft hackle and marabou wing streamers. I love to tie the old fashioned streamers with feather wings and I love to fish them but marabou is easier to tie with and many times will out fish a feather wing streamer. There is a time and a place for everything, and there is always a place for a marabou wing streamer. I tie some with thin sparse wings and some with thick heavy wings. They look ridiculous when dry but when marabou gets wet the fly takes on a life of its own. I’ve never been able to tell if the sparse wings out fish the heavy wings or vice versa, they both work. Your wing should be as long as the tail of this streamer. If you want eyes, the original pattern used Jungle Cock nails.

That’s it! The Black Ghost Marabou Streamer is my first choice at ice out and is a “go to” fly all summer. If you take the time to learn to tie marabou wing streamers, you’ll be glad you did. I can’t think of a better fly to tie while learning to use this fish getting material.

Posted in Fly patterns | Tagged , , | Leave a comment

The Black Ant

black_ant
The black ant has been a “go to” fly for me for over 20 years. It was my last resort one night a long time ago when the trout were taking something I couldn’t duplicate. I found a black ant in my box and within minutes it was torn to shreds from multiple takes. I looked upstream and noticed a power line going over the river I was fishing; ants must have been falling off the line and into the water. That’s how Black Ants became my favorite terrestrial.

My dad started me fly fishing with hoppers, so I don’t knock them. As time goes by, it seems to me that the black ant is over looked. That’s a shame because I’ve landed several 18 inch trout on this fly. The real beauty of this version is how simple it is to tie, and how easy it is to teach a youngster to tie. Years ago, I used black thread to build up a body and varnished it. It was a long tedious method and I hated it. Black single strand floss never worked for me; it was too slippery and the body never stayed in the right shape. A few years ago I learned that well known fly tier and author named Dick Talleur used Uni Stretch. I tried it and became a convert. My black ants looked better than ever and were easier to tie. Go buy a spool of this stuff; you’ll be glad you did. I’m not talking about Uni-Thread or Uni-Floss. Those are good products but Uni-Stretch is what we want to tie the Black Ant fly with. Use it with a bobbin as the thread to tie this fly.
Here is the recipe for the Black Ant:

Thread – Black Uni-Stretch

Hook –Dry fly hook, I used Mustad 94840, size 12-16

Body – Black Uni-Stretch

Hackle – Black, 2 turns

Head cement over wraps on body to create hard shell

Lock the hook very tightly in the vice. The hook has to be tight because you are going to pull the Uni stretch tight as you build up the body. Uni-Stretch is a lot stronger than thread, and you need to pull hard when you wind it. When you wind it on with a lot of pressure, your body becomes easy to shape and control.

Look at the shape of the body; it is almost wasp like. Notice how the back segment goes halfway down the bend of the hook. Ordinarily, you have to be very careful when you do this on a fly. You can put so much material on the bend of the hook that you block the gap of the hook. This makes the hook less effective at catching the lip of a trout. Since this fly has a narrow “waist” right above the hook point, the gap opens and the hook works fine. That is good, because this fly is fished on a dead drift. Build the back segment by wrapping tightly, and then tie in a black hackle at the waist. Out west, I used a hen hackle. The softer fibers have more movement. I have discovered that ordinary black hackle works fine in Maine, so that is what I use. If you have soft hackle and want to use that, by all means try it; your mileage may vary. What is important is that you use two wraps of hackle only. Remember, ants only have 6 legs, so don’t tie a bushy dry fly. After you tie off the hackle in the waist of the fly, wind twice and then build a front segment. Remember to pull the Uni Stretch tightly and both segments should be easy. There is no head to tie off; just whip finish when the body is complete.

You should cover the body but not the hackle with head cement. I’ve tried special glossy cements, black lacquer, and even super glue. Ordinary head cement works fine. I’ll be honest with you; I also keep a black ant in my box that I didn’t coat with anything. It floats better at first but soon gets water logged. There have been a few situations where I wanted to have a light, floating black ant to drift past a fish and the cemented one does sink faster. The cemented fly is my first choice but fly tying is about having a box full of choices so I keep one “light weight” in the box as well. You can add a wing or make change the color; red and black together work well for some people.

Black ants routinely fall off bridges, telephone wires and tree branches. If you see something overhanging the water that an ant might crawl up on, give this fly a shot. It is simple to tie, easy to fish and a great fly to teach a youngster.

Posted in Fly patterns | Tagged , , | Leave a comment

The Shufelt Special

kelly_sept_2006

When I called Bob Shufelt of Greenville, Maine to ask him about his famous creation, he was friendly and willing to tell me that he designed the fly almost 40 years ago and kept it a secret for over a decade.  Gradually the word got out and knowledgeable guides and fly fishers began to add this remarkable streamer to their boxes.

During the fall, togue move out of deep water and into shallow water to spawn. They will attack anything that they perceive to be a threat to the nest. This is the time to use large, colorful flies. But it is more than just a fall togue fly; it is a great streamer all season long.  A friend of mine, Bob Ganem of Bangor, uses it to pull more salmon out of Grand Lake Stream than anyone I know and I’ve watched him break one off on a striped bass at the Eddington boat landing on the Penobscot River. My friend winters in Florida and he has caught snapper, tarpon and a 47 inch barracuda with the Shufelt Special. This streamer does it all and it’s easy to tie, so let’s get started.
 

Recipe for the Shufelt Special

Thread – Black

Hook – Size 2-8 streamer hook, 8X long

Tail – Golden Pheasant crest tippets

Body – Silver Mylar

Wing –White marabou over red bucktail, over yellow bucktail

Eyes – White with black center

Super glue

There are some things to know about this fly. Most of the time I like a sparse streamer but not so here; I tie this fly bushy and it works better that way.  And big!  I currently tie them on size 2 or 4 hooks that are 8x long.  Don’t skip the eyes; they’re more important than you think. Bob Ganem has tested both and claims that a Shufelt Special with eyes works better by a factor of 2 to 1. Bob Shufelt heartily agreed with me; he didn’t put eyes on his early versions but added them later and feels that the fly works better with eyes. Paint eyes on this fly.

Start with a good bunch of golden pheasant crest tippets. Be sure to use your thread to smooth the tie and put a good thread base for the Mylar body that is coming up. A good trick here is to start the fly with white thread. If there is a gap in your Mylar body, black thread can be seen through the gap but white thread seems to hide the gap better. Tie the Mylar on at the head and wind it back to the tail and then wind it forward to where you tied it on. Two layers make a big difference in Mylar bodies.

The first part of the wing is yellow bucktail. Use the long hairs from the top third of the bucktail and they will flare less. The wing should be longer than the hook shank but not as long as the end of the tail. I touch some super glue to the base of the bunch of bucktail before I tie it on the hook. This allows me to tie it on more gently and not pull on the thread so hard that I flare the wing. The fly survives striped bass and togue better as well. Tie a similar bunch of red bucktail over the yellow; each wing should be the same size. My yellow bucktail wings lay close to the hook shank and I like that, the red stays on top and forms a nice silhouette. Finally, tie on a good bunch of white marabou.  Getting marabou long enough for a hook with an 8x shank is difficult, but you can find it in the fly shops if you look. Ask the owner for help.

I paint the eyes on with lacquer. Use a bodkin to put a drop of white on the side of the head. Wait a minute for the surface of the white drop to harden a bit and touch it with a small drop of black lacquer. Hang the fly allowing the eye to dry and then use head cement to finish it. The chemicals of lacquer are different than most head cements and if you put head cement over a still wet lacquer eye, the eye may never dry.

The Shufelt Special is a great streamer with a lot of uses. I’m sure that this fly would work well in Canada and I know it works well here. I’m not surprised to hear it works well in salt water as far south as Florida. It is an easy streamer to tie. You should tie it and you should fish it.

Posted in Fly patterns | Tagged , , | 1 Comment